Tuesday, December 17, 2013

The Art of the Carved Letter

When working with Dave Fisher this summer, one of the many things that really impressed me about his work was his engraving.  Using a simple pen knife he created the most beautiful and lively letters.  The profile of the blade and the qualities of the wood helped shape the types of cuts he could make, so the "font" he uses is, in many ways, an expression of the tool and the wood as much as his sense of what a particular letter should look like.

Along similar lines, I enjoyed this video on stone engraving.
http://www.folkstreams.net/film,141
I found this video fascinating from start to finish, but a few moments stopped me in my tracks.
About 4:40 in, one of the artisans paints "Anno Domini." The grace of his hand movements and the fluidity and vitality of the brush strokes is mesmerizing.
About 15:20 in there is a time lapse shot that shows how the sunlight moves across a letter.  I found it a great reminder that when I engrave wood I am not just drawing lines.  Instead, by incising surfaces I am creating shapes with light and shadow.  Many of our workspaces are flooded with electric light, making it hard to see what effect our engraving really has.  Yet when I worked with Dave this summer, I was struck by how he turned off the overhead lights when we got to work, letting the natural light rake across the surfaces we were carving, revealing the faceting of the tool marks or the shape of the engraved letters.

"What is he" by DH Lawrence.

Robin Wood posted this on his blog, and it is so good I just have to repost it here to make sure I can find it agin.
What is he? 
-A man, of course. 
Yes, but what does he do? 
-He lives and is a man.
Oh quite! But he must work.  He must have a job of some sort 
-Why? 
Because obviously he’s not one of the leisured classes. 
-I don’t know.  He has lots of leisure.  And he makes quite beautiful chairs.
There you are then!  He’s a cabinet maker. 
-No, no 
Anyhow a carpenter and a joiner. 
-Not at all.
But you said so 
-What did I say? 
That he made chairs and was a joiner and carpenter 
-I said he made chairs, but I did not say he was a carpenter.
All right then he is just an amateur? 
-Perhaps! would you say a thrush was a professional flautist, or just an amateur?
I’d say it was just a bird 
-And I say he is just a man. 

DH Lawrence

Monday, December 16, 2013

Elopement Spoons

My dear friend Andy and his new wife Michelle visited us in New Hampshire this weekend.  They were driving back from Nova Scotia, where they had eloped!  I could not be happier for them both.  When I heard that they were coming through our neck of the woods, I dropped everything and started  making them a wedding gift.  I decided on a pair of spoons cut from the same apple branch.  Michelle is a farmer and manages an apple orchard (in fact they were rushing back to PA so she could start pruning the trees for the winter.  Good thing too, as we got a foot of snow in the North East this weekend!) I also turned a porringer for them to share.  I thought it a nice analogy for marriage: two spoons but a single bowl.
In my haste I did not take photos of the bowl, but here are the spoons:


Friday, December 13, 2013

Art vs. Craft

Recently I posted a thread on a green woodworking newsgroup that got me thinking about the art/craft debate.  I was writing about my experiments using hot oil baths on my spoons and bowls, and one frequent participant asked:  Would you not be wiser to spend more time carving another spoon and less time decorating?   Hmm.  Well, I see oil as a protective and not a decorative thing, but his point is well taken.  One essential element of craft is the skill involved in making something.  To "craft" something is to make it carefully, lovingly, by hand.  In fact, craft can be a verb, where as art can't, emphasizing the centrality of "making" to the word craft.  So I respect his suggestion that I carve another spoon, as only with practice does someone acquire such hand skill.  

Yet his comment about spending "less time decorating" might also echo another concern among craftspeople; that "craft" connotes things cheaply decorated without thought or aesthetic taste--think macaroni art that kids make at summer camp in their "Arts and Crafts" class. Or, at its most depraved, this:


If craft and art are at opposite ends of a spectrum, this is one of the dark extremes of the craft axis: decoration without thought or aesthetic taste.

On the other end, the art end, of that axis might be something where art is full of thought but lacks skill or craft, which was one of Duchamp's points when he submitted this "Fountain" to the Society of Independent Artists.

Here, thought reigns supreme and the artist and skill have been taken out of the equation.  Obviously, much is lost without the artist's skillful hand.

Anyway, the first participant's "less time decorating" pejorative touched off comments from others on the site, one of which wrote the following: The reason for decorating is to make your piece more pleasing to the eye and to show a little bit of artistry in your work. Could the time be better spent making another spoon? Perhaps, but artistry is the difference between being a craftsman and a mere producer.  My ears perked up at the word "producer," a common term used to describe the new role that craftspeople took when, unable to compete with mass-produced copies, they lost their craft business and were forced to become workers on an assembly line, many times "producing" the very thing they used to craft.  "Producer" it seems to me reflects the loss of skill during the Industrial Revolution.  It would seem here that a "mere producer" is one who makes innumerable objects without thought or an aesthetic sense.  Again, we are back to BeDazzling, in a way.  Yet this also points at another contour of the craft/ art debate.  Craft relies on making many objects, where as art relies on making fewer.  Photography and printmaking certainly play with this idea, but those artists usually reproduce only limited series, carefully signing and numbering them to maintain their "artiness" (though craftspeople often add makers marks and dates to their work...)  

It would seem the trick of craft is not to make so many of something that the thought goes out of it, but to make enough to develop skill.

Another dichotomy in the craft/art debate certainly involves form and function.  While art is made for contemplation, craft is made to be used.  That is definitely the case with Robin Wood and his beautifully turned bowls.  He wants them to be used, and yet he has gained such fame that many people are probably collecting his pieces.  If a craft object is put on the wall and stops being used, does it become art?  If art is useful, does it become craft?  
Are my spoons now art?


Are they now craft?

Because craft is about usefulness, craftspeople work hard to develop forms that are functional and effective.  Those forms are developed and refined over long periods of time, generations even, and are passed down from one craftsperson to another.  Thus craft tends to be more traditional, where as art aspires to innovate.  Art looks for new ways of thinking about the world, and tries to break free of traditions.

As far as the maker movement goes, I am not quite sure what it entails.  It does seem to focus on the DYI ethic and on ways that the internet can bring information and establish new communities.  I have certainly learned a lot from the internet.

Tuesday, December 3, 2013


Simply Yoav from Schwachter X-photography on Vimeo.

So much of my interest in green woodworking has to do with leading a simpler life.  Well, that is not entirely true.  With family I find it hard to think I might live in a yurt.  But the principle of it still appeals to me.  Also, what if I burn out entirely on teaching and just can't go on?  What then?  I would like to think I have a skill set beyond academic education.  Maybe my interest in this is a way of designing a back door on my current life?  Who knows.
Anyway, above is a lovely video about living simply in Israel.

Monday, December 2, 2013

"Firing" bowls and spoons in oil.


This summer I experimented with heating wood in oil, and posted a thread on the Bodgers site.  https://www.bodgers.org.uk/bb/phpBB2/viewtopic.php?f=23&t=2881 Lots of dialogue in that thread, but here are the basics of my post.

I bought a $30 slow cooker/crockpot to do the heating. Blanks of various woods in various states of dryness have been submerged in flax oil and are happily warming now. I have it on the "low" setting, which seems to be about 275 degrees. After the first few hours the oil came to temp and moisture began to condense on the lid, which means some wetness is getting forced from the wood. I also saw lots of little bubbles coming from the ends of the wood as air escaped and oil entered. Now eight hours into the experiment and the bubbles have slowed considerably and no more moisture is condensing on the lid. I will unplug before bed and let cool overnight and see what it looks like in the morning. Of course I have been doing all of this outside, with fire extinguisher handy! :D Tomorrow I plan on cutting a few of the blanks in half to see how much penetration I got. I am curious to see if the oil reached the center of the blanks and if the moisture is still in the greenest pieces. I also wonder if the oil has penetrated to the center, if it has cured or if it will still be wet. If still wet, I will probably take some bits and put them in the oven at 225 degrees and bake them. Maybe I can force them to cure? Or maybe I can start an awful oil fire in my home. My wife should love that. More later.

Hi everyone,
So, some background info on where I got the idea from. Dan Dustin, in his little book "Spoon Tales", talks about a New England tradition of cooking axe handles in oil to harden them. He says he learned it from a blacksmith in New Hampshire named Norris Patch, who was a friend of his grandfather. Anyway, he writes that he raises "the temperature slowly over a period of about eight hours, then 'cook[s]' the spoons for about two hours at 213 degrees Fahrenheit in a mixture of about half beeswax and half walnut oil, boiling off the moisture and replacing it with wax and oil." When I spoke with him recently he said that he also soaks his wood in water for years before using. Not sure of all the other tricks he has learned over the last forty years of spoon making, but the results are really different than my spoons. His are heavier, stiffer, yet really fun to hold. Thanks to him for the idea. More on my results soon.

Hi again.
So, the results:
After "firing" the wood in oil and letting cool overnight, I cut each piece in half. All of them were fully saturated with oil. It penetrated right to the center. No wonder Dan's spoons are heaver than mine. They are truly full of oil. Once that oil polymerizes and hardens, the wood should be quite strong. No wonder artists have used linseed oil for centuries as a medium for oil paints!
Second, after "baking" pieces of the "fired" wood in the oven at 225F for 2 hrs, I found that very little oil left the wood. No real change in color or texture or weight. I will keep an eye on them over the next few days and see how the baked ones cure compared to the ones simply fired.
I will abstain from weighing in on the reasons for decorating crafts, though oiling does not seem like decoration to me. It seems like protection, allowing for a long, useful life for your spoon.
Next, I will "fire" one of my first bowls. I just built my first lathe a few weeks ago, and finished my third bowl today (along with running this experiment).

More (and more dramatic) results to report:
My eldest daughter was turning eight yesterday, and had been asking for her own special bowl like what Mommy and her sister have. So on Friday night I set about turning her a little kuksa out of relatively green maple. The wood cut wonderfully and even spun moisture out the ends during turning. Definitely green wood.
Emboldened by my recent experiments, on Saturday I put that new bowl into a mixture of linseed and beeswax, along with an older bowl that had already air dried. I cooked them both for eight hours and they reached a max temp of about 270F.
The results:
As you can see, cracks emerged in the end grain and the edge distorted pretty significantly in the green bowl. Live and learn. I will probably try to repair with epoxy.


Besides cracking the green wood, the oil/wax cooking also had an interesting impact on the dry bowl. Below is a shot of two bowls made from the same spalted birch. The one on the right has been simply soaked in oil for a few days. The one on the left was cooked in the oil/wax bath. It turned much darker than the other bowl, and did seem to warp more along the rim than the other.


Friday, November 29, 2013

New documentary on Mike Abbot

As I started exploring the world of green woodworking, it became apparent that England has a thriving movement.  Names kept recurring, like Robin Wood, Ben Orford, Barn the Spoon, and many others.  Mike Abbot was another of those woodworkers, but a certain reverence was assigned to him in most blog posts.  He teaches green woodworking and especially chair making in East Herefordshire, and has also published at least three books on the subject.
Anyway, I ran across a trailer for a documentary on him, due to come out soonish.
Here it is:

Green Wood (Preview) from Elliott Forge on Vimeo.


Also, I quite like Eliot Forge's videos.  Worth following on Vimeo.

Tuesday, November 19, 2013

Fan bird carving


Something I want to try soon, for the holidays.

Here are a few detail shots of the blank:


LatheLoop


P.R. from Michael for the upcoming exhibit.  I break down the lathe and resurrect it in the exhibit space next week.

Monday, November 18, 2013

Ben's Mill: Making a Sled

This is a fascinating documentary.  Produced in 1981, it examines the work of Ben Thresher, a craftsman who straddles (straddled?) two different ages of technology.  Ben runs a water-powered sawmill in Vermont, one of the last of its kind.  The mill, built in 1848, is powered by a waterfall with all machines belt driven.  There he produces all sorts of amazing, old-time products, from water troughs to horse sleds.  His expertise is just amazing.  I love how he deftly moves through the various steps in producing objects from wood and metal. Maybe what interests me the most is how he lives in two worlds.  In this documentary you get a glimpse into a time when the world of craft was giving way to the world of industry, and for a brief time, coexisted.   It is about a hour long, but well worth the time.

Sunday, October 27, 2013

What the wobble?

Ok, if there is anyone out there with some experience with turning bowls, can you explain this?
 Below the core and the mandrel you can see where I am chasing a bead down, and yet in just one part of the bowl the bead is sort of wavy, and only in that portion.  I was working hard to hold my tool steady, but maybe I was not working hard enough.  You can see it a little better below:
Was the mandrel loosening up and causing a weird wobble?

Monday, October 14, 2013

Treenware at the MET

This weekend Alyssa and I were lucky enough to be in NYC and had a wonderful date at the MET.  Wandering through the "visible storage" section, full of just amazing works of furniture and carved chests, I came across a very small display of treenware.  Several turned bowls, and two spoons.  Two objects caught my eye.  The small bowl/porringer below seemed to bare the marks of treadle lathe turning.  The long, thin handle made it feel more like a scoop than a bowl.  As the stem joined the bowl below the rim and the bottom of the stem angled up slightly, I imagine it would not have been bad to hold, cupping the bowl in your palm and bringing your thumb over the top of the stem.  Still, not much to hold onto.  Maybe 6" across and 2.5" tall.  Dates from somewhere between 1700 and 1900.
You can also see small 6" plates on display on the lower shelf.

You can also see a large burlwood bowl in the background with a crack in the rim, also turned.  

There was also a small spoon on display, maybe 7" long, that caught my eye.  The handle met the bowl in a very simple way, with no curve when seen from above.  The maker did not have to deal with changing grain direction.  These in a way look like some of the English spoon designs I have seen--certainly not Scandinavian.  The rim of the bowl was flat. I tend to make mine with a bit of a curve to the rim to let the upper lip easily contact the bottom of the bowl.  The spoon was also generally dated as from between 1700 and 1900.

The small scoop behind the spoon was made of bone or something.  The larger spoon to the left was less interesting.

I think what was amazng for me was to see how little woodware was on display, compared to the ceramics and metalwork.  It really illustrated to me how rare historical examples of woodware is.

Thursday, October 10, 2013

On knowing and understanding

For going on twenty years now I have made a living teaching history, usually some version of United States history.  And some time every January I have found myself discussing the Industrial Revolution, the plight of the craftsperson and the changing nature of labor.  I have always wondered at the cruel irony where, say, shoemakers watched their businesses wither as cheap, mass-produced knockoffs flooded the market, only to find themselves forced by necessity to take a job in one of the competitor's shoe manufacturing facilities, endlessly stamping leather into the same patters, having lost all control of the design and production process of which they used to have such intimate mastery.  Craft was integral to our cultural DNA, expressed in such surnames as Turner, Smith, Potter, and Fletcher, and to watch it die out so quickly must have been a major shock. But what I never really understood, though I knew and even taught others about it, was the complexity of the skill sets that were lost.

Like I said, I make my living teaching.  I like to think I am pretty good at explaining things.  But when faced with the complexities of bowl turning, with so many "moving parts," I find myself at a loss for words.  Beyond the intricacies of wood selection, moisture content, etc..., just the methods of grasping the tools and presenting the hooks to the wood are immensely complex.  The hook of the tool should be at a right angle to the piece, rotated slightly to "present" a bit of the blade to the wood. But when you consider that the blade can be moved up and down, fore and aft, in and out, and rotated, and remember that the surface you are working is concave in some instances and convex in others, understanding the right angle of attack is not an easy thing.  And at times I find the best way to remove wood is to bring the blade nearly parallel to the surface.  Which of the three hooks should you use?  Should you use it hook side up or hook side down?  Should you work on a plane level with the centers, or below the centers?  Should you hold the handle under your arm, or in your hand, or cradle it like a baby?  Banging around in my basement, with no guidance other than a few you-tube videos, I have longed for someone to look over my shoulder and give me some guidance.  But no one around me does this type of turning.  I think there is one guy in Western Massachusetts that teaches bowl turning on a treadle lathe.  There are also several folks out in Wisconsin and Michigan.  But I felt pretty alone in that moment, and truly understand, not just know, what skills were lost with the Industrial Revolution.

Wednesday, October 9, 2013

The lathe in action


Traditional Turning

About a year ago, as I became more and more frustrated with the noise, expense and dust involved in "brown" woodworking (using seasoned wood and power tools), I came across the following video.  It is a gem, and well worth 7:43 out of your day.  This video changed my whole perspective on woodworking.


Lovely, yes?
In the video Robin Wood describes his first encounter with George Lailey's work, and has this initial response: "I imagined it would be quite straight forward" and  "It can't be that hard, why is no one doing this?"  I have to admit, upon seeing Wood's video I thought the exact same thing--how hard could this be?  Looking at the lathe, there is nothing too complex in its construction, right?  And the tools--they are dead primitive.  So why not do it?

I looked on line for plans for a bowl-turning treadle lathe, and some exist, but most plans are for spindle turning lathes.  Such a setup is much lighter, as the machine does not have to resist the mass of the spinning bowl as it changes direction.  So, I took the basic design elements from the spindle-turning lathe and just overbuilt it.  Overbuilding is not hard to do.  In fact, I think it is our default mode whenever making anything.  Expertise is shown in what you can take away.  It is about simplifying, as Robin speaks to.

Anyway, first I sourced the beams.  There is an old, dilapidated barn near our home in New Hampshire and I figured the owners would not mind if I repurposed some of the hand-hewn beams lying about.
These are amazing beams, with axe marks from the hewing process, mortice joints with pegs, all the details of a past art.  After hauling them back to my driveway, I removed the nails and washed the wood with a deck cleaning spray that stops mold from spreading.

Once dry, I set to building the lathe.  3/4" threaded rods are all that hold it together.  I did cut notches for each piece to fit into, but really it is the rods that holds the whole thing together.


Leveling the bed


And now, the lathe lives!
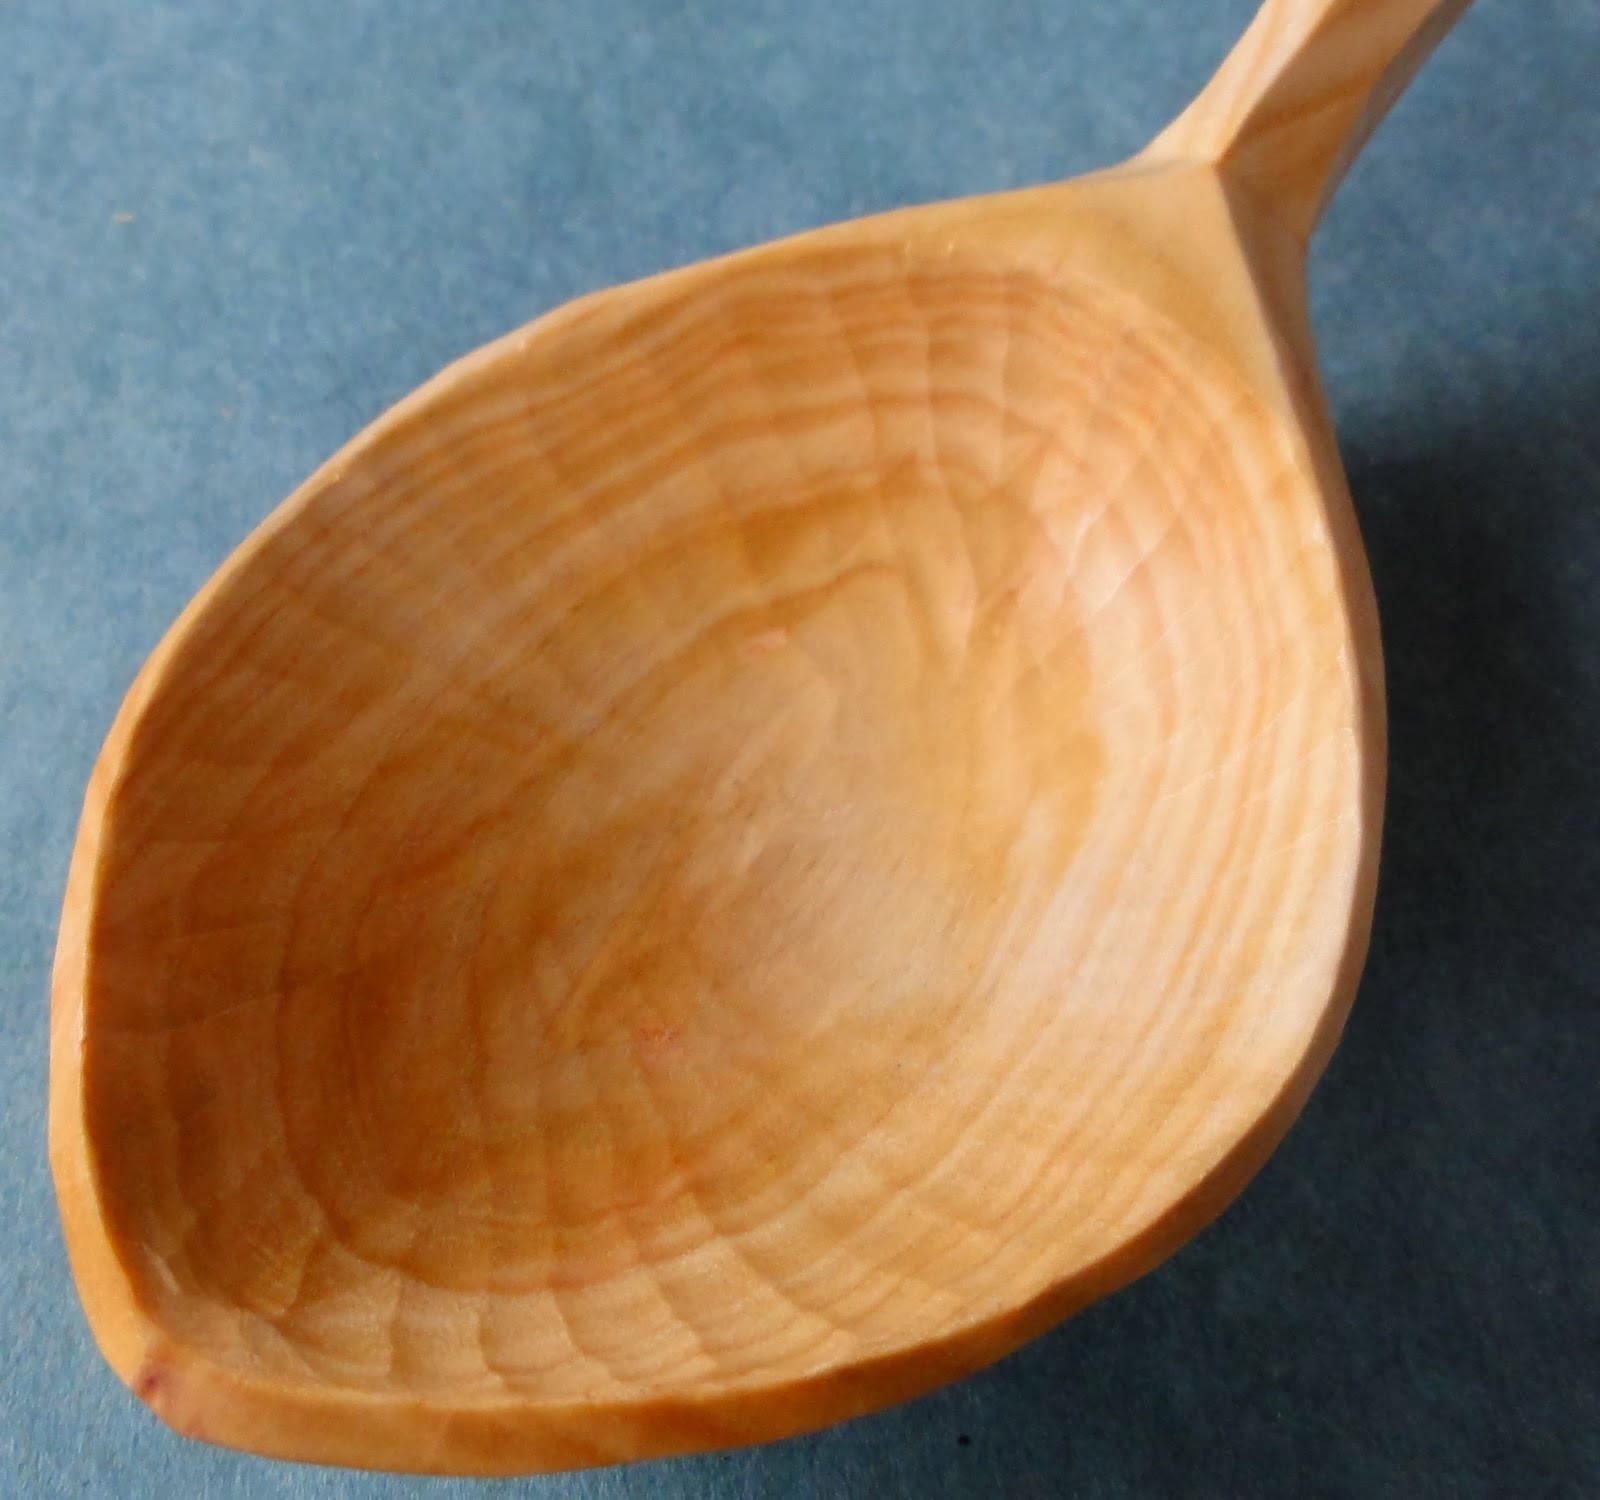
But I will tell you something--when Robin Wood said it took him five years just to learn the basics, he was spot on.  I would be lucky to learn the basics in five years.  There is so much to consider, including the state and type of wood, preparing the blanks, sharpening the tools, making sure everything is in alignment, how to use the tools, how fast to push the treadle, etc, etc, etc...  This is not easy.  And yet, one thing amazes me.  With such little precision (the "centers" aren't even in the same plane!) and such crude construction, that darn thing works!  I can't believe it actually works!  Magic.


Sunday, October 6, 2013

Mike Loeffler

Some lovely two-tone painted spoons by Mike Loeffler, shown on Jarrod's site. I imagine that with wear the undercoat will start to poke through...  Looks like milk paint, which I am starting to experiment with now.


Alistair Dargue


Jarrod StoneDahl

As part of the scrapbooking function of this site, here are a number of shots from Jarrod StoneDahl's site.  He carves beautiful, more Scandinavian
spoons, and also has shots of some lovely ones he did not carve himself.

Artist's Statement

My friend Michael, head of the Visual Arts department at Dana Hall, wants to exhibit my work in the school gallery.  I am pulling together some of the spoons, cups and bowls for the exhibit, as well as various tools.  Michael even wants to install the lathe in the gallery and have demonstrations!  Should be a lot of fun.  Anyway, in preparation for the show he asked for an "artist's statement."  I was not sure what such a statement looks like.  I am certainly not an artist, and hardly a craftsperson, but I banged out the following for the purpose.

My interest in making spoons, cups and bowls for family and friends really comes from my interest in stories. There are moments in our busy lives when we have the fortune to interact with meaningful objects. We sit in our grandfather’s chair, or slip on the sweater a loved one made.  And in those instances a significance and a narrative enters our everyday lives. I think people today crave those stories more and more.  We want to know where our clothes were made or where our food was grown.  We can all eat a delicious meal in a restaurant, but what many of us crave is a homemade dish.  Why? In part I think this is because we live in a largely mass-produced society, filled with objects made a world away and destined for the landfill.  It is hard to cozy up to an Ikea bowl and think, “Wow, this bowl was made by machines in China, shipped to me in a container ship, and when it breaks I will throw it away and think nothing of it.”  That is not a memorable breakfast narrative. 
Yet many mornings in my house, as I rush around preparing my kids breakfast and packing lunches, I find my six-year-old daughter Mae calmly pouring her glass of milk into a small wooden cup I made her.  Of course she could have just as easily drunk the milk right out of the glass I served it in, but she wants the pleasure of drinking from “her cup.” 
“This morning, I drank milk from the cup
that dad carved for me.”
Those are the moments I am seeking out more and more these days, and hand carving spoons, cups and bowls is part of that.
Each of these objects is made from specific bits of wood: birch and beech cut from my home in New Hampshire; cherry cut from my mother’s back yard; Norway maple salvaged from the trees recently felled on the Brook Path.  Each object is made with hand tools only.  All pieces bare the marks of their making, and none are sanded.  And each piece is made for a particular person or occasion.  Many of my spoons are now in the hands of family members, and they won’t give them up: baby spoons for my brother’s new child; anniversary spoons for my in-laws; serving spoons for my mother.  Those items that did make it to this show are used daily in my house: breakfast bowls, coffee cups, special spoons.  Eating with wood is “quiet, warm, and comfortable,” as one craftsman put it, and the utensils grow more beautiful the more they are used. 
               I hope you enjoy them, but do it quickly, because Mae wants her cup back.


grand opening

For about a year now I have been messing around with green woodworking, and it has been a really interesting ride so far.  I have been inspired by many people out there who graciously maintain blogs for the benefit of all, like Robin Wood and Peter Follansbee, so now I am trying to give back.  Not sure who will read this except friends and family, but if any get inspired by what I post here, great.  If none find anything interesting, that is OK too, as I will also be using this blog as a scrapbook of sorts, keeping the tricks and techniques and inspired designs that I want to emulate in one place.  Hope you enjoy.