Saturday, December 21, 2019

Peter's pedagogy

I just finished a project inspired by Peter Follansbee's book Joiner's Work, and it got me thinking about pedagogy.

Years ago, I asked Peter about a (4" square) stile that he was preparing from greenwood.  "Don't you worry about checking with such a thick bit of wood?"  Without missing a beat he responded, "not much."

This attitude runs through Peter's teaching.  If you have ever seen his videos or had the fortune of taking a course with him (maybe through Plymouth Craft or Lie Nielsen), you may have appreciated how he teaches just enough to get you started and keep you safe, but not so much as to confine your growth.  There is such a thing as "overteaching."  Overteach and each decision the student makes becomes overthought, precious, and tentative. 

Instead, Peter encourages you to worry only about what really matters (for example, that the face and side of a stile are square, or that you get your right leg out of the way when axing.)  The rest will take care of itself.  He often avoids giving measurements, forcing you to find something that works for you.  Or he says things like, "drive the pin into this hole, but stop right before the stile splits."  His purpose in teaching is not to save you from a mistake, but only to make you aware of the risk and allow you to find your own way.  As Peter once explained to Roy Underhill: "Good judgment is the result of experience. But do you know where experience comes from?  It's the result of poor judgment."  So just get on with it.

Want to know how much offset is good when making drawbored joint, and how much deflection a pin will take before cracking?  Give it a try and see.

Will your frame come out square?  How square does it have to be?  Well, best give it a try.

How much taper should your pins have?  How hard can you hit them?  Have at it!

I look through these photos now and see plenty of mistakes: rough carving, irregular surfaces, wonky joints--all good learning opportunities.


Sunday, December 8, 2019

Locking lidded boxes


I have really enjoyed chasing the "locking lidded box" form this past year and thought I would share a bit about my journey.  I first came across these boxes in a blog post by Jarrod Dahl, where he kindly shared pictures of "Rare Wooden Objects" that he studied during a trip to Sweeden in 2015.  Since then Jarrod has taught others how to make these boxes, including one course at Brook House Wood in Herefordshire, the UK in 2017.  It was a class for advanced turners, which you don't see much.  Owen Thomas, Sharif Adams, and Yoav Elkayam attended--all outstanding turners in their own right.  They all went on to produce their own versions of these boxes.

While there is now a fair amount online about these boxes, when I first started I had trouble finding clear images, especially of the insides of the boxes.  I knew the lid had tabs that locked under a ledge in the box itself, but the details were elusive.  How exactly did the lid "lock?"

I guessed that the ledge on which the lid sits must be carved away to form a ramp.  The ramp would gradually tighten against the flanges on the lid, thus tightening the box.  For the sake of clarity, here are a few sketches that name the parts of the box.  If you use different names for the parts of the box, let me know!

The "bowl," with "lip, ledge, ramp and notch"

The "lid" with tab, tab base, and nob

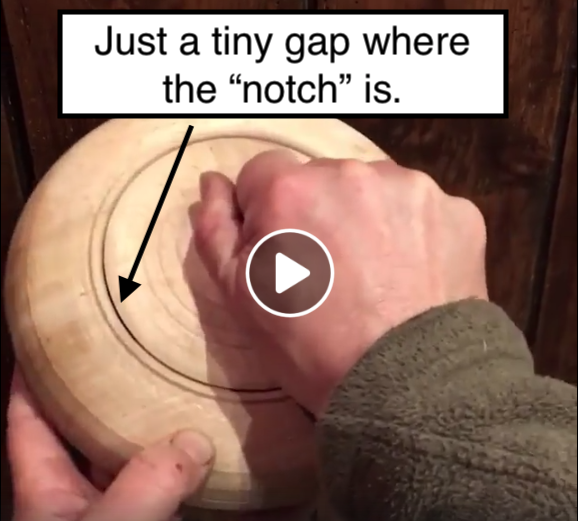
I turned a few iterations, each time gaining a bit more insight into how the form would work.  Below is one iteration, where I made two mistakes.  One was using two ramps, which you don't need.  The other was removing too much ramp material on the left notch, which leaves a gap between the bowl and the lid.


Here is another early iteration.  It worked a bit better with only one ramp.


I found that using stable wood is key in this sort of project--if the rim of the bowl warps or cups, your lid won't sit flat.  Radial, semi-dry blanks, with the radial face becoming the top/opening of the bowl, seems to work best.  All of mine so far have been beech.

Even with a relatively stable radial blank, there is going to be a little radial shrinkage (say 2-6%), whereas there will be almost no longitudinal shrinkage.  You can use this to your advantage.  In the above image, you can see how the grain is running between 12 and 6 o'clock.  As the bowl dries, it will become relatively narrower in width than in height, becoming slightly oval or even egg-shaped.  See where I started the notch and the ramp?  It is right in line with the grain direction, at 12 o'clock.  This means as lid "tightens" against the ramp, the wood is also getting narrower in width, which accelerates the tightening effect.

Another possibility with these boxes is to forget the ramps and rely solely on the shrinkage to lock the box.  Below is a still from a video by Sharif Adams.  Here the box is ready to be opened.  If you look closely, you can see two chip-carved triangles on the left lining up, one on the lid and one on the box.  You can also see the grain direction of the bowl and lid in the same orientation.

Here Sharif is locking the lid, righty-tighty.  

Notice how far the lid turns to lock--nearly a quarter of a turn, but not quite.  Since Sharif is not using a ramp, he is relying entirely on the ovalizing effect of shrinkage to cause the lid to bind against the short side of the bowl.  This takes precise turning and a real understanding of how much your wood will shrink.  Remember, if the lid does not lock after a quarter of a turn and passes that shortest width section, it will never lock at all--it will just spin.  So, props to Sharif for a really precise bit of turning.

In my case, I prefer using ramps for a few reasons.  One is I can shape the ramp to ensure that the bowl locks tightly.  The other has to do with aesthetics.  Both the bowl and the lid ovalize in drying.  If you rely on the ovalization to lock the box, it means the lid's grain direction will be at 90 degrees to the bowl's grain direction when locked. This means the oval of the lid will not sit sweetly within the oval of the bowl--they will be at right angles.  This opens up gaps between the lid and the lip and can even reveal the notch. For example, you can just barely make this out in the image below.  Sharif is such a skilled turner and his tolerances are so tight that you can only barely see the notch.  If the lid and bowl's grain goes in the same direction, it is easier to cover the notch.

However, if you use a ramp and start the notch at say 10 o'clock, you can control the tightening so that the grain of the lid and bowl line up when locked--like this:  

Lots more to share about this type of turning, especially in how to make the various cuts.  Plenty of below and behind-center turning, and big risks for catching.  Maybe more on that later.

Hope this helps.

Turn on.


Update, 2/20/26.  These days I make boxes on an electric lathe, and have fully embraced the use of radial shrinkage to make the lid cam on to the base.  No ramps are necessary.  In fact, ramps tend to cause the lid to sit off-center on the base.  I will write on my updated process in the near future.


Sunday, October 27, 2019

Snibbskål, or "eared bowls"

Known in Sweedish as snibbskål, or a bowl (skål) with ears or tabs (snibb), these sweet little bowls are becoming a favorite in my house.  I also really enjoy making them, as the blanks are relatively quick to produce and the carving is certainly exciting with all those ears spinning in space.

I was first introduced to this form by Robin Wood's book on the Wooden Bowl.  Later, Jarrod Dahl wrote about them after his trip to Sweeden.  Finally, a few years back I was fortunate to take a course with Robin at Greenwoodfest, and he gave some pointers that inspired me to give them a go.  

One big draw is that axing out snibbskål blanks is easy, or at least easier, because you don't have to take off the corners.  When making a round bowl blank you should take the time to axe it into a roughly round form.  In the case of snibbskål, you just leave the corners square and about an inch thick, as they will become the ears.  When axing, bring down the corners of the blank first and then attack the remaining peak in the center.  It comes together pretty quick.  Robin even suggested that, despite the difficulty of turning the ears, the form is easier for beginners because it is so easy to prep.

There are several challenges when turning these bowls.  One is that, for me at least, they feel best in the hand when the tabs rise slightly.  Tabs that come straight off the bowl feel sharp and awkward and look out of place against the rising form of the bowl (see below).  The underside of the ear settles into the web between your thumb and pointer finger, and a curved surface feels better than a straight one in that sensitive area.  Once your thumb wraps over the top of the tab, the body of the bowl settles nicely into the cup of your palm.  Done right, these bowls feel amazing when held with just one hand, secure and in control.  But be careful; you can also take that rise too far.  Too much rise and your thumb feels trapped or wedged against the rim.  I also appreciate it when the tab is thin (about 1/4 inch or slightly less) and has a consistent thickness. I take it slow when refining the shape of that tab.
https://digitaltmuseum.se/021028341226/skal

Another design element that I try to keep in mind is how the rim is connected to, or flows from, the body of the bowl, despite the ears interrupting that flow.  Imagine the curve of the bowl continuing through the ears and then picking up again at the rim.  

Of course, the exciting bit about turning these bowls is the ears.  They are but a blur as they spin, and you have to take things slow.  Especially when turning the upper surface of the tab, work from the edge towards the rim and take light cuts.  Move too fast and your hook will catch or leave a gouge, like this:

"Skål" literally means "bowl," but is also a common toast when drinking, a bit like "Cheers!"  As Robin points out, this hints at the long tradition of drinking from bowls (think cafe au lait bowls).  With this in mind, I make these with a lip that curves in, or is a little "closed," to help keep the liquids from sloshing around too badly.  Also, consider the thickness and profile of the rim; if you will be bringing it to your lips, he rim shouldn't be too chunky or sharp. 

I have written about this elsewhere, but I have enjoyed charring my bowls these days, especially the insides of the bowls.  Seems to me that you want the hydrophobic and hard surface where the foods or liquids will sit.  Also, the velvety black surface visually sets off the food and makes it look amazing (especially yogurt and peaches.)


Saturday, October 19, 2019

Fits and starts

Fall always seems to be a "return to craft" time for me.  Summer comes and the outdoors calls, but as the season changes and as I need a break from grading, I always turn to craft in the Autumn months. Helps me stay balanced.
We took down several red oaks over the past year, and what has not been turned to firewood is now making its way into various projects.  A quick and easy one, which helped me practice dimensioning stock and carving, was this instrument rack.  Carving inspired by Peter Follansbee.  I enjoyed exploring free carving and textures with this piece.  Made a punch for the upper background but went for a scalloped/carved texture around the s-scrolls.  Milk paint slightly rubbed away highlights the effect.  I like it.  

I am also amazed at how forgiving the eye is, a point that Peter makes well.  I think he talks about "imprecise symmetry," or something along those lines. 

Anyway, it has the ukuleles off the floor, which my wife appreciates.


Saturday, June 16, 2018

Greenwood Fest, or, "It took me five years just to get the basics..."

"I imagined it would be quite straightforward. It actually took me five years just to get the basics."--Robin Wood.

Five years ago I built my first lathe and started on this turning journey. It has been a blast, full of mistakes and lessons and outright laughter. Do I have the basics down? Maybe, but I also know enough to sense how little I know. I have found that making mistakes early and often is a key to growth, and nothing to get upset about. After ruining a rather large beech bowl the other morning while trying to separate it from the core, I laughed so hard my daughter rushed to the shop thinking I had injured myself. It was a good lesson, about the toughness of dryish beech and the fragility of the thin base. I posted a shot of the bottomless bowl to Facebook, and comments flooded in on how I should save it--glue in a plug, turn a pedestal, repurpose it. All fine ideas, but to what end? I am all about repurposing, but am I in this to turn bowls, or to learn to plug holes in bowls? Owen Thomas's response was best: "Chuck it in the f*ck-it bucket." Get on with turning another.

For years I have learned through trial and error. How many rims did I ruin? How many times did the hook catch and the mandrel come loose? How many bowls checked while drying? Often I wished a more experienced turner was looking over my shoulder and giving tips, which is why I so enjoyed short courses over the last few years with some great turners. The pre-fest courses at Greenwood Fest gave me the opportunity to work with Jarrod Dahl last year and Robin Wood this year. Both courses were mind-expanding. There was one point last year when Jarrod leaned over and said something like, "No, turn the tool upside down and attack the rim from the other direction." My head nearly exploded. I was ready for instruction and gained a lot from the experience.

This past Greenwood Fest with Robin was no exception. Just watching him turn was a course in itself. Noticing the little things, like how he starts a rim, the way he steps the outside of his bowl, the sweeping cuts he uses on the inside, how he "cores." Below, Robin was illustrating how little pressure is needed to get the hook to engage, trying to get new turners to avoid the death grip.


I definitely learned a lot from Robin, especially about hook design. He asserted that making hooks is easier to learn than turning bowls. That is encouraging, as I plan to start "bashing out" hooks this summer.

One challenge with both Jarrod and Robin's course was the heterogeneous class, with about half the students new to this type of turning and the rest with a few years experience. It takes about a day to get the new turners sorted, which leaves little time to help the rest of us refine our work. Nothing either instructor should have done differently, (except maybe making sure the lathes were stable and running sweetly before we got there) but it definitely cut down on instruction time for the more experienced. If I take another course it will either be one-on-one or one for more advanced turners.

As with all Greenwood Fest events, a big draw is the attendees. A chance to catch up with old friends (Oliver Pratt, Etienne Vincent and Jake Peters in the turning class, Dave Fisher, Tim Manney and Derek Sanderson running their own shows), and to meet some new people, like Dawson of "Michigan Sloyd" Moore, was great. And the quiet moments, just reflecting and having a good time--sitting on the dock with Oliver, Jake and Dawson, sipping bourbon, the sun setting, watching an osprey snatch fish out the water and haul them off to her nest. Doesn't get any better than that.

Thanks to all the instructors and attendees for a great time.


Tuesday, January 2, 2018

Burning bowls

While I love the effect of milk paint, especially the way layered colors gain character through use, I have been experimenting recently with shou sugi ban.  Shou sugi ban (焼き杉), literally "burnt cedar board" or "grilled cedar," is an ancient Japanese technique of preserving wood by charring.  A more accurate term might be "yakisugi", as it seems shou sugi ban is actually a western misinterpretation of the Japanese kanji.  No matter what you call it, the burnt surface is dark, rich and textured,  especially once oiled.  It is also bug, fire and water-resistant, allowing some structures to last for hundreds of years.  You can get lots of different effects with different burn times and treatments.
https://goo.gl/fepi8s
When used on bowls, this technique can create some really striking effects.  The surface is velvety smooth and inviting to the touch.  Visually, the matte black sections seem to suck in all light, such that if you char only the bottom of the bowl, it makes the upper rim appear to float in space...


The process is pretty easy and there are lots of videos online to get you started--just burn, brush, wash and oil.  As nearly all of the tutorials online focus on burning cedar siding, I thought I would share some insights into how this technique might translate to smaller birch bowls. 

As I understand it (and I am no chemist!), charring wood alters the surface of the remaining material.  The cell walls of wood are made up primarily of cellulose, which is hydrophilic and helps draw water through the tree.  Lignin takes up much of the space within the cell walls and helps give strength to the plant.  Lignin is hard and hydrophobic.  When you burn wood, the cellulose vaporizes first as it burns at a relatively low temperature, leaving behind lignin, which burns at a higher temperature.  Thus, charring creates a hard, hydrophobic skin of lignin and carbon on the wooden bowl.  While I don't care about the other benefits of shou sugi ban (termite and fire resistance, for example), I sure like the idea of my bowls resisting wear and water!

Most videos online show people using a roofing torch on cedar planks, but that is overkill for a little bowl. I use a simple Bernzomatic propane torch, which costs about $30.


Obviously, it is preferable to work outside on a non-combustible surface.  If you are going to burn the outside of the bowl, I recommend propping it on top of an empty tin can.  No matter how dry your bowl is, as you burn the outside moisture will be driven from the inside, and it needs a place to go.  Be prepared for the bowl to warp a bit, even if it is "dry."  I have not had one crack yet, but you can see it change shape through the process. I try to keep the flame moving over the whole bowl for a bit, bringing the entire piece up to temperature before really working on one spot.  

Heat bounces.  As you approach a foot, bead or decorative cut, you will find that the heat does not make it into the valley of the cut.  Instead, it will project out and burn the surface at a right angle.  This means you can cook the foot pretty good trying to get heat into the valley between the bowl and the foot. I have learned to embrace these lighter areas.


Here you can see the light line around the base of the foot, yet heavy burning on the rim of the foot itself.  Heat bounces and does not penetrate into valleys very well. Embrace it.


The other reality that comes from this bouncing effect is that a bead can be used as a "wall" to separate a burned section from a non-burned section.  
Here the bead acted as a "wall" and helped protect the rim band from burning and proving a sharp transition.


Inscribe first, and then kiss the surface with the torch for a nice contrast.
I can also envision how one might add a design by using masks to protect some areas from burning.

If you do burn right up to the rim, be careful of thin lips.  They will catch fire faster than the rest of the bowl, and if an ember forms it can burn a notch in the lip pretty quickly.


Here you can see both a decorative cut spared from burning, which is a nice bright line, and a rim burned too much, where an ember formed and burned down into the bowl.


Once the burning is done and the bowl is cool, move on to brushing.  I recommend a nylon brush to remove the excess carbon.  If you don't remove the excess carbon now, the bowl will leave marks on surfaces later.  Just like when you sand milk paint, watch out that excess soot does not stain the rest of the bowl.  I am often surprised by how much of the luscious black comes off with brushing.  Don't worry, once oiled that black color will come right back.  


Here the bottom half of the bowl has been brushed with a nylon brush. The top has not.  No worries--that brown post-brushing color will turn black with oiling.    


The reason I like the nylon brush over a rag is that rags often leave behind fibers, especially if you rub against the grain.


I then recommend rinsing the bowl, again being careful not to let the loose soot stain other parts of the bowl. Some people blow the dust away with an air compressor.

Once dry, oiling is pretty straightforward, though be careful not to rub excess oil from the dark areas onto the lighter areas.  Here you can see the oiled wood returning to a nice, dark shade.


Here the top half has not been oiled yet, but the bottom has.  Nice, luscious black tone.   


After oiling.


I am now experimenting with chip carving burnt bowls.  The charring is not just a patina, it goes down a ways, so only the bottom of a chip reveals the unburnt wood.  But I like the effect.  I was always hesitant to chip carve painted surfaces, as the pigments dull the knife edge.  With shou sugi ban there is no such concern.


So, there you go. Hope that helps.  Enjoy and be safe.


焼け  
  "burnt bowl"

(update, 9/19: charring the interior of a bowl is also lovely and worth exploring.  I have done it on a number of bowls and it works great.  That said, watch out if the exterior of the bowl is already painted as it might cause checks, maybe because the paint alters how the exterior skin releases heat or expands.  Maybe the checks were already there before charring and I did not notice them, but worth watching out for in the future.)

(update, 11/21: After scorching, let the bowl cool completely before brushing off excess char while running the bowl under water.  The water soaks into the super dry bowl so fast that it can cause dramatic cracking!)