Wednesday, October 13, 2021

The marks of life


    It has been a while since my last post.  Life threw a few curveballs, precipitating a move to a new home, a new job for my spouse, new schools for the kids, a new commute for me, etc...  The dust is settling now, literally, as we finish renovating, much of the work we did ourselves (demo, paint, flooring, kitchen, doors, trim, etc...)  Now a new normal is settling in, allowing for a little more time to enjoy life and heal from the transition.

    And so, this past weekend we took time out for ourselves and went to the local country fair.  The weather was glorious, clear, and crisp, and the foliage was near its peak.  Changing leaves always make me wistful and nostalgic, as they so clearly announce the passage of time.  And so we seized the moment, eating ridiculous fried food, wondering at the enormity and power of oxen, and watching the kids spin themselves silly on rickety rides. 

    We also enjoyed the local craft offerings, of which there were many.  So many skilled craftspeople in our area, especially the quilters and potters.  Around here, there are always more of these folk than woodturners.  Of the turners that I do come across, they generally seem to be working in the same genre: electric lathes, dry wood, and lots and lots of sanding.  The end result shows off the grain of the wood to be sure, but to me, it invariably looks machine-made.  Any sign of life, in the wood itself or in the marks left by the maker, has been obliterated--dried, sanded, and polished out of existence.  The skills demonstrated are admirable, but I am not personally drawn to the end product.  And this is pretty much the only type of turning represented at my local craft fairs.

    As my life settles down and I can again return to turning, I am reminded of what draws me to this process.   I love the way greenwood moves, the way it exerts its own energy and takes the form it wants.  I appreciate the marks left by the maker--the turning cuts and even the axe scars that bear testimony to the hand that made the object.  I enjoy observing paint wear with use, marking the passage of time, like seasons changing and leaves falling in autumn.  


Wednesday, May 13, 2020

Adversity and invention

In these extraordinary times, everyone has to adapt.  Working and schooling from home, competing for internet bandwidth with my wife, trying to carve out quiet space for everyone--it poses challenges.  For me it has become increasingly obvious that my basement workshop is poorly suited for our current lifestyle.  Noise travels too easily in our house and I am constantly disturbing others.  I have dreams of a standalone shop and even built a platform in the trees where I might someday have a treehouse workshop, though the family loves the platform as it is, and I can't take it back now.  But maybe I could set up an outdoor lathe on the platform?!?

Lugging my old lathe up there was out of the question.  It is monstrously overbuilt and nearly immobile.  So over the past few days, I banged together a Viking-style lathe to use outdoors and travel with if necessary.

As the name implies, this form of lathe has been in use for thousands of years and is a pretty simple affair: a single thick board for the bed, a notch cut down the center to hold the poppits, legs insert into holes in the bed.  Years ago I saw photos if Robin Wood making such lathes.  He attached the legs, stood on the bed, and cut the notch with a chainsaw.  It was quite a sight!  Ben Orford used such a lathe in his videos on turning bowls.  (I bought my first hooks from Ben and they are still among my favorites.) Since then I have had a chance to use a few of these lathes, mostly at Greenwood Fest courses with Jarrod Dahl and Robin Wood.  They are pretty simple to build, and if you are interested and want some guidance, Owen Thomas has just released a series of videos on how to build one of your own, and Sharif Adams also has plans and some great videos on turning.  I built mine in just a few days.

The new lathe has its quirks, and I am still fine-tuning the setup, but it works just fine. 


Turning outside can be idyllic or horrific, depending on the weather.


But there are some mornings when going to turn is in itself an experience. 


Our current adversity also comes with new opportunities--more time with family, more time for hobbies, more creativity. I hope you are safe and healthy.

Thursday, April 23, 2020

Supporting the craft community

In these strange and scary times, I am feeling very fortunate.   While so many are isolated, out of work, and even struggling with their own health, I am feeling pretty secure.  Thankfully, my family and I are in good health.  My wife and I can work remotely, so our income is secure.  We live in a lovely environment where we can get out and exercise.  Stands of birch and beech surround my home; I have more wood than I can imagine and lots of time to turn it into lovely little objects.  I am one lucky guy. 

So, I have been turning and carving a lot these days.  Staying at home allows me to slow down, take the time to refine designs, pursue some new forms (more on that later) and experiment with different paints and finishes.  Honestly, it is all a real luxury.  As a result, I now have a surplus of bowls and spoons, more than my family needs or my friends want.  

I have been planning on selling my work to the public for some time now, but the COVID 19 crisis is making me pause.  While my day job is secure, there are plenty of full-time craftspeople who are really struggling.  They have seen their teaching income dry up, and while some are leading virtual carving lessons and generating great videos to increase visibility, I imagine many are relying on craft sales more than ever.  Maybe now is not the time to open up shop?  Maybe I should just box it all up and wait for another time?  (Not that I am expecting some big rush to buy my bowls...) 

I have started posting my work on this blog under a new tab titled "Craft."  Maybe someday I will put up a "for sale" sign, but not today.  Instead, I think I will support some of my favorite craftspeople.  I hope you will consider doing the same.


Thursday, January 30, 2020

A "nestle" of new spoons.

What does one call a group or collection of spoons?
I asked the "Spoon Carving, Greenwood working, and sloyd" Facebook group and my favorite response was "a nestle."  (Thanks Thomas Silberberg.)  So, here is the latest nestle of spoons, carved over the past week or so.  Mostly black birch, which I like carving but is quite hard compared to other birches I have used in the past.  I will let them cure for a while before they find homes.

Saturday, December 21, 2019

Peter's pedagogy

I just finished a project inspired by Peter Follansbee's book Joiner's Work, and it got me thinking about pedagogy.

Years ago, I asked Peter about a (4" square) stile that he was preparing from greenwood.  "Don't you worry about checking with such a thick bit of wood?"  Without missing a beat he responded, "not much."

This attitude runs through Peter's teaching.  If you have ever seen his videos or had the fortune of taking a course with him (maybe through Plymouth Craft or Lie Nielsen), you may have appreciated how he teaches just enough to get you started and keep you safe, but not so much as to confine your growth.  There is such a thing as "overteaching."  Overteach and each decision the student makes becomes overthought, precious, and tentative. 

Instead, Peter encourages you to worry only about what really matters (for example, that the face and side of a stile are square, or that you get your right leg out of the way when axing.)  The rest will take care of itself.  He often avoids giving measurements, forcing you to find something that works for you.  Or he says things like, "drive the pin into this hole, but stop right before the stile splits."  His purpose in teaching is not to save you from a mistake, but only to make you aware of the risk and allow you to find your own way.  As Peter once explained to Roy Underhill: "Good judgment is the result of experience. But do you know where experience comes from?  It's the result of poor judgment."  So just get on with it.

Want to know how much offset is good when making drawbored joint, and how much deflection a pin will take before cracking?  Give it a try and see.

Will your frame come out square?  How square does it have to be?  Well, best give it a try.

How much taper should your pins have?  How hard can you hit them?  Have at it!

I look through these photos now and see plenty of mistakes: rough carving, irregular surfaces, wonky joints--all good learning opportunities.


Sunday, December 8, 2019

Locking lidded boxes


I have really enjoyed chasing the "locking lidded box" form this past year and thought I would share a bit about my journey.  I first came across these boxes in a blog post by Jarrod Dahl, where he kindly shared pictures of "Rare Wooden Objects" that he studied during a trip to Sweeden in 2015.  Since then Jarrod has taught others how to make these boxes, including one course at Brook House Wood in Herefordshire, the UK in 2017.  It was a class for advanced turners, which you don't see much.  Owen Thomas, Sharif Adams, and Yoav Elkayam attended--all outstanding turners in their own right.  They all went on to produce their own versions of these boxes.

While there is now a fair amount online about these boxes, when I first started I had trouble finding clear images, especially of the insides of the boxes.  I knew the lid had tabs that locked under a ledge in the box itself, but the details were elusive.  How exactly did the lid "lock?"

I guessed that the ledge on which the lid sits must be carved away to form a ramp.  The ramp would gradually tighten against the flanges on the lid, thus tightening the box.  For the sake of clarity, here are a few sketches that name the parts of the box.  If you use different names for the parts of the box, let me know!

The "bowl," with "lip, ledge, ramp and notch"

The "lid" with tab, tab base, and nob

I turned a few iterations, each time gaining a bit more insight into how the form would work.  Below is one iteration, where I made two mistakes.  One was using two ramps, which you don't need.  The other was removing too much ramp material on the left notch, which leaves a gap between the bowl and the lid.


Here is another early iteration.  It worked a bit better with only one ramp.


I found that using stable wood is key in this sort of project--if the rim of the bowl warps or cups, your lid won't sit flat.  Radial, semi-dry blanks, with the radial face becoming the top/opening of the bowl, seems to work best.  All of mine so far have been beech.

Even with a relatively stable radial blank, there is going to be a little radial shrinkage (say 2-6%), whereas there will be almost no longitudinal shrinkage.  You can use this to your advantage.  In the above image, you can see how the grain is running between 12 and 6 o'clock.  As the bowl dries, it will become relatively narrower in width than in height, becoming slightly oval or even egg-shaped.  See where I started the notch and the ramp?  It is right in line with the grain direction, at 12 o'clock.  This means as lid "tightens" against the ramp, the wood is also getting narrower in width, which accelerates the tightening effect.

Another possibility with these boxes is to forget the ramps and rely solely on the shrinkage to lock the box.  Below is a still from a video by Sharif Adams.  Here the box is ready to be opened.  If you look closely, you can see two chip-carved triangles on the left lining up, one on the lid and one on the box.  You can also see the grain direction of the bowl and lid in the same orientation.

Here Sharif is locking the lid, righty-tighty.  

Notice how far the lid turns to lock--nearly a quarter of a turn, but not quite.  Since Sharif is not using a ramp, he is relying entirely on the ovalizing effect of shrinkage to cause the lid to bind against the short side of the bowl.  This takes precise turning and a real understanding of how much your wood will shrink.  Remember, if the lid does not lock after a quarter of a turn and passes that shortest width section, it will never lock at all--it will just spin.  So, props to Sharif for a really precise bit of turning.

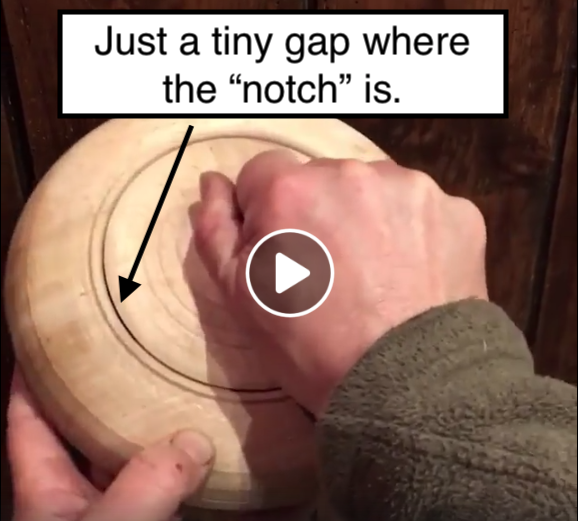
In my case, I prefer using ramps for a few reasons.  One is I can shape the ramp to ensure that the bowl locks tightly.  The other has to do with aesthetics.  Both the bowl and the lid ovalize in drying.  If you rely on the ovalization to lock the box, it means the lid's grain direction will be at 90 degrees to the bowl's grain direction when locked. This means the oval of the lid will not sit sweetly within the oval of the bowl--they will be at right angles.  This opens up gaps between the lid and the lip and can even reveal the notch. For example, you can just barely make this out in the image below.  Sharif is such a skilled turner and his tolerances are so tight that you can only barely see the notch.  If the lid and bowl's grain goes in the same direction, it is easier to cover the notch.

However, if you use a ramp and start the notch at say 10 o'clock, you can control the tightening so that the grain of the lid and bowl line up when locked--like this:  

Lots more to share about this type of turning, especially in how to make the various cuts.  Plenty of below and behind-center turning, and big risks for catching.  Maybe more on that later.

Hope this helps.

Turn on.


Update, 2/20/26.  These days I make boxes on an electric lathe, and have fully embraced the use of radial shrinkage to make the lid cam on to the base.  No ramps are necessary.  In fact, ramps tend to cause the lid to sit off-center on the base.  I will write on my updated process in the near future.


Sunday, October 27, 2019

Snibbskål, or "eared bowls"

Known in Sweedish as snibbskål, or a bowl (skål) with ears or tabs (snibb), these sweet little bowls are becoming a favorite in my house.  I also really enjoy making them, as the blanks are relatively quick to produce and the carving is certainly exciting with all those ears spinning in space.

I was first introduced to this form by Robin Wood's book on the Wooden Bowl.  Later, Jarrod Dahl wrote about them after his trip to Sweeden.  Finally, a few years back I was fortunate to take a course with Robin at Greenwoodfest, and he gave some pointers that inspired me to give them a go.  

One big draw is that axing out snibbskål blanks is easy, or at least easier, because you don't have to take off the corners.  When making a round bowl blank you should take the time to axe it into a roughly round form.  In the case of snibbskål, you just leave the corners square and about an inch thick, as they will become the ears.  When axing, bring down the corners of the blank first and then attack the remaining peak in the center.  It comes together pretty quick.  Robin even suggested that, despite the difficulty of turning the ears, the form is easier for beginners because it is so easy to prep.

There are several challenges when turning these bowls.  One is that, for me at least, they feel best in the hand when the tabs rise slightly.  Tabs that come straight off the bowl feel sharp and awkward and look out of place against the rising form of the bowl (see below).  The underside of the ear settles into the web between your thumb and pointer finger, and a curved surface feels better than a straight one in that sensitive area.  Once your thumb wraps over the top of the tab, the body of the bowl settles nicely into the cup of your palm.  Done right, these bowls feel amazing when held with just one hand, secure and in control.  But be careful; you can also take that rise too far.  Too much rise and your thumb feels trapped or wedged against the rim.  I also appreciate it when the tab is thin (about 1/4 inch or slightly less) and has a consistent thickness. I take it slow when refining the shape of that tab.
https://digitaltmuseum.se/021028341226/skal

Another design element that I try to keep in mind is how the rim is connected to, or flows from, the body of the bowl, despite the ears interrupting that flow.  Imagine the curve of the bowl continuing through the ears and then picking up again at the rim.  

Of course, the exciting bit about turning these bowls is the ears.  They are but a blur as they spin, and you have to take things slow.  Especially when turning the upper surface of the tab, work from the edge towards the rim and take light cuts.  Move too fast and your hook will catch or leave a gouge, like this:

"Skål" literally means "bowl," but is also a common toast when drinking, a bit like "Cheers!"  As Robin points out, this hints at the long tradition of drinking from bowls (think cafe au lait bowls).  With this in mind, I make these with a lip that curves in, or is a little "closed," to help keep the liquids from sloshing around too badly.  Also, consider the thickness and profile of the rim; if you will be bringing it to your lips, he rim shouldn't be too chunky or sharp. 

I have written about this elsewhere, but I have enjoyed charring my bowls these days, especially the insides of the bowls.  Seems to me that you want the hydrophobic and hard surface where the foods or liquids will sit.  Also, the velvety black surface visually sets off the food and makes it look amazing (especially yogurt and peaches.)