
A notebook on greenwood carving
Saturday, December 30, 2017
Friday, December 22, 2017
Platform project
A few years ago I built a play structure for the girls, which they dubbed the "pirate platform:" zipline onto the platform, slackline, hammock, etc...

Lovely place to take your morning coffee.
Recently, my youngest daughter Mae asked that I build another, maybe with the possibility of adding a treehouse at some point. We will see...

Main beams hoisted and bolted into position. I was super thankful for my brother's help on this part of the job. Each beam was super heavy, made of two 2 x 12 x 14' pressure treated (and wet!) boards. Did not have a block and tackle, so it definitely took two people to get them into place. Thanks bro!


Answer? Counterweight. That board dangling just off the ground is tied to lines that run up through pulleys and then down to the joists. This relieved just enough weight for me to push the platform around on the beams and center it.

How to add the endcaps when I am the only one on the job? Answer: use joist hangers upside down, which now guide the cap onto the joists, ensure the joists are equally spaced, and keeps the cap from falling to the ground. Made sense to me at least...

Not easy to screw those caps into place. Climbing gear made the job easier, and fun.

The client came by for a peak at the progress. She seemed quite happy. Love the overalls!


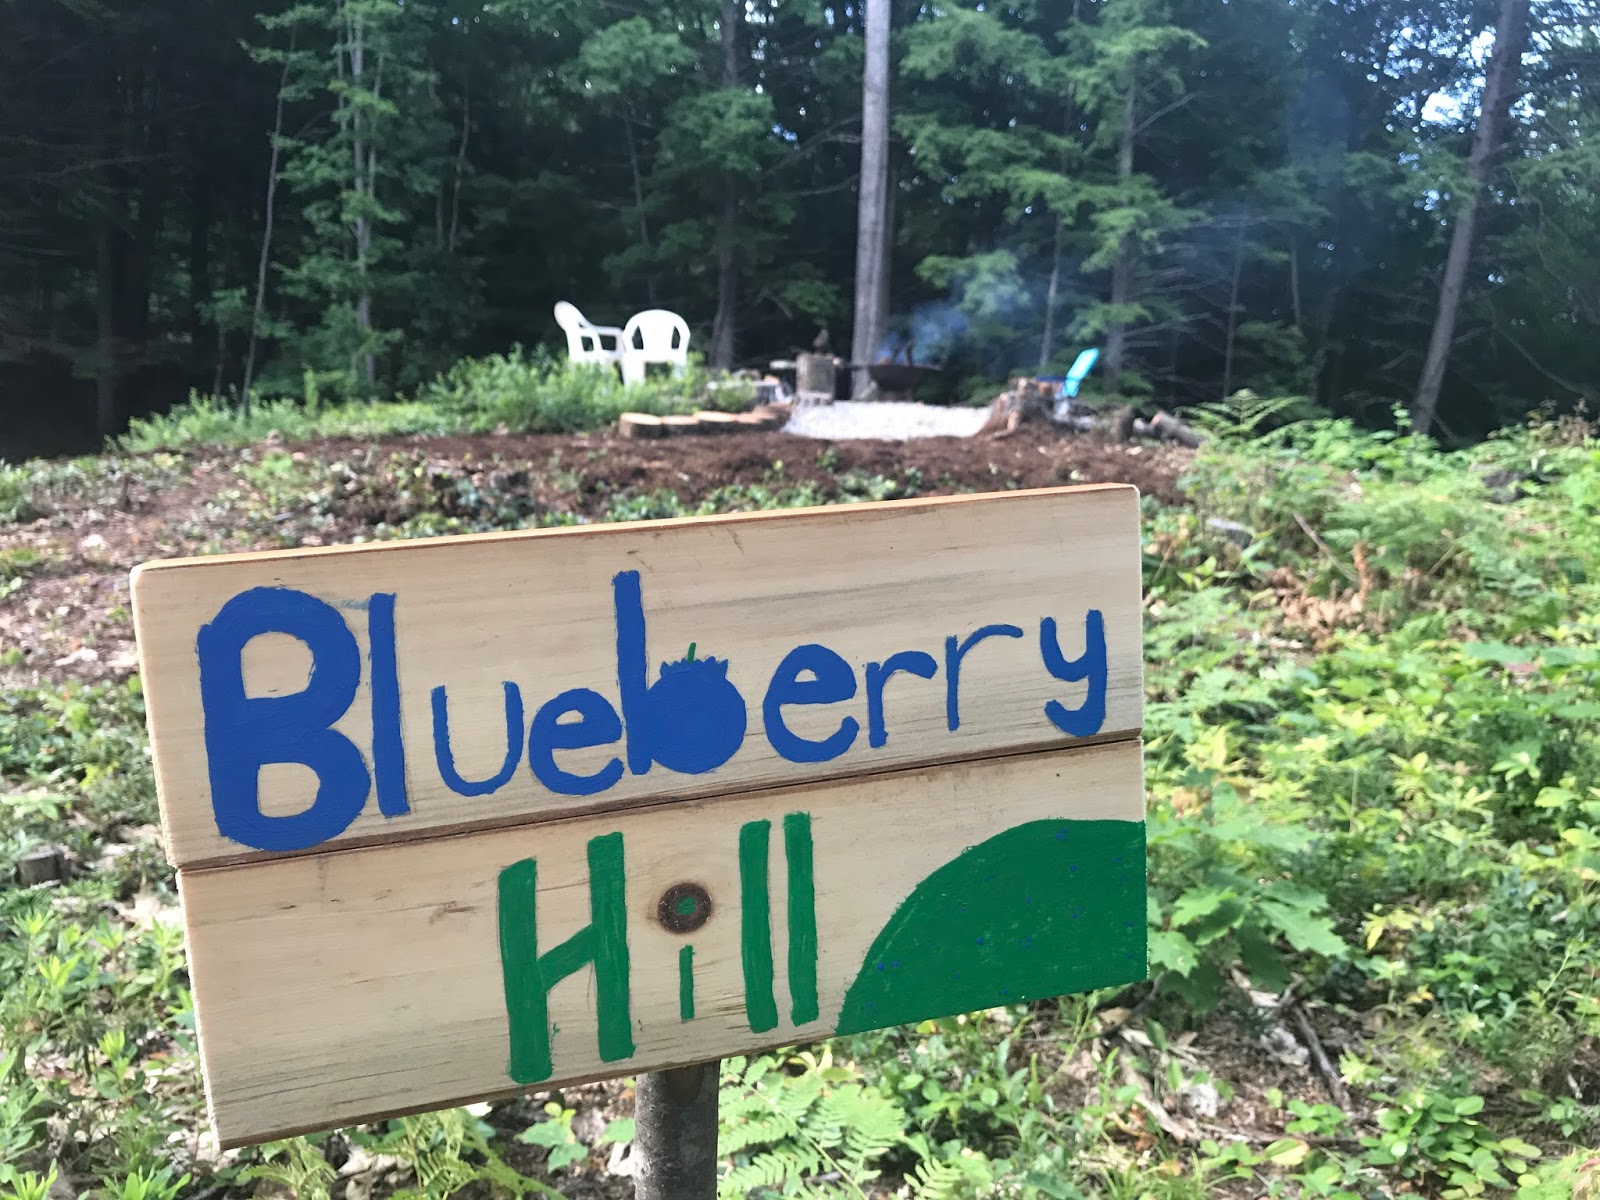
Final result. Enough room to hold a party, though I gotta get railings and a staircase up before we do that. But it has a nice view of "Blueberry Hill" across the way.
This was another big project, building a gravel patio on top of this hill. Four yards of 3/4" gravel up there. Had to rent a small tractor for that job...

Finished just in time for "Jug Band" Camp. Here a few of us are sitting out on top of Blueberry Hill, on the new gravel patio, making noise. You can see a six-person tent on the platform in the distance.
New shop
Settling into a new shop space, and it makes me happy.
For the past thirteen years we have lived "on campus" at the school where I work. I am very thankful for that time in our lives, especially as it let us save money for a getaway in New Hampshire. My first shop was set up there, which meant most of my woodworking happened during vacations. But this spring we finally moved off campus and into our own home (just a few miles down the road from my job.)

It is a great little house for a lot of reasons, but I was especially excited about the possibilities for a basement workshop.

You can see it has a fireplace, which took a bit of cleaning before it would function. The chimney sweep said it had not been cleaned for years...


For the past thirteen years we have lived "on campus" at the school where I work. I am very thankful for that time in our lives, especially as it let us save money for a getaway in New Hampshire. My first shop was set up there, which meant most of my woodworking happened during vacations. But this spring we finally moved off campus and into our own home (just a few miles down the road from my job.)


But once I got things sorted, it is now feeling homey, especially when I have the fire going.

I am still sorting out the lighting situation, and I need to paint and get tool racks up. But this is a good start. Makes me happy.
Monday, December 11, 2017
Mbiras/Kalimbas
Winter affords the carver a range of pleasures: the joy of carving by the fire on a long winter night, giving away craft during the holidays, and scoring that new tool. But it also comes with challenges. In the northeastern U.S., winter means substantially drier air in the workshop. Drying times suddenly shorten, and what once took days or even weeks to settle into its final shape now snaps to form in a matter of hours. For the bowl turner this means treating all but the thinnest work very carefully, wrapping it up in cloth or paper bags, burying it in shavings, etc... Add to this the fact that some of us lucky souls have a wood stove or fireplace in our workshop. I moved into a new home recently, and my new shop has a working fireplace. I can not tell you how awesome this is. Just sweep the shavings into the fireplace, toss a match, and viola--a clean and warm shop. But this wonderful feature is not so wonderful when you find a batch of bowls ruined by overly hot and dry air.
If this has happened to you, and you don't know what to do with the bowls with the checked rims, you might try building a "mbira."

These African instruments are pretty easy to make. Flatten the rim of the bowl (which lets you carve out the cracked lip where the rings were tight). Plane a thin top (I used pine here, but I am told that the material used for the top of an instrument has a big impact on the sound quality. Koa? Spruce? Mahogany?) Glue a block of wood to the underside of the top and put t nuts into the block, into which you can anchor the screws that hold the aluminum rod above. Glue the top onto the bowl, trim to shape, and bore a sound hole. The silver bar is aluminum (easy to machine), smaller bar is brass (looks nice and matches the brass screws), and the tines are made from a sewer rod (a new one!) You tune the instrument by pushing the tines in and out to get the right tones. Lots of different tunings--I tuned mine to the C-scale, diatonic--good for jingle bells.
Tuesday, January 24, 2017
I need to make a reamer and tenon cutter
I am writing this as a reminder to myself: I have wanted to make stronger legs for benches and stools, and I now realize that I need to make a reamer (and an accompanying tenon cutter). Dave Fisher's recent post got me started on this.
Here is an article from greenwoodworking.com

Here is an article from Tim Manney on making a matching tenon cutter.
Eric, do this!
Here is an article from greenwoodworking.com
Here is an article from Tim Manney on making a matching tenon cutter.
Eric, do this!
Monday, January 23, 2017
Spoon "tattooing"
Been on a kolrosing kick these days.

Kolrosing is a scandinavian technique whereby the carver makes shallow cuts into the surface of the wood and drives a pigment into the cuts. It is similar to scrimshaw designs in ivory and even tattooing in skin. While the wood does not "heal" as a tattoo would, the fibers can be burnished to lay over the cut, and once a drying oil like flaxseed is applied and dries, the pigment is pretty well held in place.
There are lots of great resources on the web to get you started. Del Stubbs at Pinewood Forge has a great intro to kolrosing page and sells really nice kolrosing knives, though you can use most any knife. His are nice because the blade has a sweeping radius, which allows for tight turns without the blade "jumping" out of the piece, and the angle of the blade lets the edge enter gradually, compressing/cutting the fibers neatly even if you are cutting against the grain. I also like the width of the blade, which forces the wood fibers apart and creates a good pocket for the pigment. Finally, the round handle reminds me of a pencil, and as such can be spun to achieve tight turns (if you are careful!)
No need for deep cuts! They will be marginally darker and wider than shallow cuts, but only barely, and if you really auger down into the wood you will have a hard time making smooth lines. Watch the grain direction as your lines come together. You can inadvertently dislodge a chip under certain circumstances (see the stem of the leaf on the right in the image below.) Use really fine powder. Well ground coffee works great, but I like taking the powder that remains at the bottom of the grinder. Powdered coffee like Nescafe works well too. I have also experimented with milk paint powder for a colored effect, though the tone is hard to distinguish. You don't necessarily have to sand the wood surface before hand, but treating the wood with a rub of beeswax or another sealant can keep the coffee from staining the surrounding wood and hiding your design. Lots of people like basketweave designs, but I prefer more freehand and flowing lines. It is challenging to get fluid curves. Sometimes it works out, like here:

Other times it does not...
 The stamen got a bit mauled. That is a really tight curve. You can also see how small lines, cross hatching, even stippling can give volume and detail to the piece. The lines are really narrow, so use lots of them.
 Here, in an earlier post on some of my work, the spoon third from the left has some cross hatching to indicate shadow. The one on the right was done with green milk paint. It also lost some of its coloration, as I did not burnish the surface enough. You can also sand the surface lightly to close the fibers.
I find that the hardest part of kolrosing is letting go. After finishing a spoon that you feel proud of, it can be hard to take a risk and scratch it all up. Like getting your first tattoo, or your first "visible" tattoo, it can be hard to get your head around permanently altering a pristine surface. But once you cross that threshold, it can be hard to stop!
PS
After my pal Oliver came to stay for week, we traded spoons. He chose one of my more heavily kolrosed spoons to take with him, saying something like, "Well, I have to take that one, because it is rad!" His comment got me thinking. What is "radical" about that spoon?

Is it the spoon's design? Probably not. There is nothing extraordinary about this spoon. It is a nice spoon, but the design is not out of the ordinary. Even some of the more particular elements of this spoon, like the asymmetrical bowl or the tiny finial, are in fact inspired by Oliver's spoons. He would not find them radical. Was the floral design itself radical? Not so much. Flowers, especially made up ones like this, are not "radical." So what was "rad" about this spoon? I think Oliver's response to the spoon is akin to the response many of us have to tattoos. When we meet a tattooed person, we seldom explore the subject of the tattoos, or admire linework, shading or coloring. Instead, one of the first and most prominent feelings many have is that the commitment of the tattoo, the commitment to permanently alter a pristine surface, is in itself radical, regardless of the subject or execution. Kolrosing is rad, in itself.

Kolrosing is a scandinavian technique whereby the carver makes shallow cuts into the surface of the wood and drives a pigment into the cuts. It is similar to scrimshaw designs in ivory and even tattooing in skin. While the wood does not "heal" as a tattoo would, the fibers can be burnished to lay over the cut, and once a drying oil like flaxseed is applied and dries, the pigment is pretty well held in place.
There are lots of great resources on the web to get you started. Del Stubbs at Pinewood Forge has a great intro to kolrosing page and sells really nice kolrosing knives, though you can use most any knife. His are nice because the blade has a sweeping radius, which allows for tight turns without the blade "jumping" out of the piece, and the angle of the blade lets the edge enter gradually, compressing/cutting the fibers neatly even if you are cutting against the grain. I also like the width of the blade, which forces the wood fibers apart and creates a good pocket for the pigment. Finally, the round handle reminds me of a pencil, and as such can be spun to achieve tight turns (if you are careful!)
No need for deep cuts! They will be marginally darker and wider than shallow cuts, but only barely, and if you really auger down into the wood you will have a hard time making smooth lines. Watch the grain direction as your lines come together. You can inadvertently dislodge a chip under certain circumstances (see the stem of the leaf on the right in the image below.) Use really fine powder. Well ground coffee works great, but I like taking the powder that remains at the bottom of the grinder. Powdered coffee like Nescafe works well too. I have also experimented with milk paint powder for a colored effect, though the tone is hard to distinguish. You don't necessarily have to sand the wood surface before hand, but treating the wood with a rub of beeswax or another sealant can keep the coffee from staining the surrounding wood and hiding your design. Lots of people like basketweave designs, but I prefer more freehand and flowing lines. It is challenging to get fluid curves. Sometimes it works out, like here:

Other times it does not...


I find that the hardest part of kolrosing is letting go. After finishing a spoon that you feel proud of, it can be hard to take a risk and scratch it all up. Like getting your first tattoo, or your first "visible" tattoo, it can be hard to get your head around permanently altering a pristine surface. But once you cross that threshold, it can be hard to stop!
PS
After my pal Oliver came to stay for week, we traded spoons. He chose one of my more heavily kolrosed spoons to take with him, saying something like, "Well, I have to take that one, because it is rad!" His comment got me thinking. What is "radical" about that spoon?

Is it the spoon's design? Probably not. There is nothing extraordinary about this spoon. It is a nice spoon, but the design is not out of the ordinary. Even some of the more particular elements of this spoon, like the asymmetrical bowl or the tiny finial, are in fact inspired by Oliver's spoons. He would not find them radical. Was the floral design itself radical? Not so much. Flowers, especially made up ones like this, are not "radical." So what was "rad" about this spoon? I think Oliver's response to the spoon is akin to the response many of us have to tattoos. When we meet a tattooed person, we seldom explore the subject of the tattoos, or admire linework, shading or coloring. Instead, one of the first and most prominent feelings many have is that the commitment of the tattoo, the commitment to permanently alter a pristine surface, is in itself radical, regardless of the subject or execution. Kolrosing is rad, in itself.
Friday, January 13, 2017
A visit from Oliver
 |
| Cherry eaters by Oliver |
Oliver also laid down some sharpening wisdom during our week together. I have struggled to get my hook knives as sharp and nick-free as my straight knives, and he showed me a method that works amazingly well. Sandpaper!? After all I have put into water stones and diamond stones, simple sandpaper works amazingly well on the curved blades. Scary sharp, and not a nick in sight.

So many of us work in solitude, especially in the winter. It was a real shot in the arm to have some creative feedback and inspiration. Thanks Oliver.
 |
| Gave this one to Oliver. |
Subscribe to:
Posts (Atom)